Monthly Archives: March 2008

Next project?

I’m trying to decide what my next project should be. I’m still planning to continue with the monthly Take It Further challenge, but I also want to get back to some longer-term projects.

The debate is whether I finish up some of the old projects, or start something new – and if something new, what?

How do other people decide what to focus on? Time is a limited commodity – there’s only so much available for me to spend with needlework. I know that if I start doing something I don’t like, it will not get done. If I start a book that I don’t like, I can stop reading and give the book away, or return it to the library, but if I start a needlework project that I don’t like, I’m then left with a pile of thread and materials which reproach me every time I notice it.

I guess one question is how to decide how much of a commitment to make to a project. The Dorset buttons I was playing with earlier in the month – those take perhaps an hour, at most. A needlepoint pillow takes a couple of months for me.

The other issue is that there are so many things to try. I have great fun checking other blogs and seeing new ideas, new techniques to try.

Right now, there are two old projects I’d like to finish. One is a cutwork tablecloth, started perhaps 10 (or 15) years ago. This is about 48″ square.

If I focused on it for a month, I could probably finish it. It needs threads trimmed, mistakes fixed, etc. Probably the first thing I need to do is air it out to make sure no mildew has gotten into it.

The other item is to finish a needlework canvas that I had been working for a piano bench. The dragon is largely done, and what is left is the background. Either I’m in for a couple of months of basketweave, or I need to come up with something a bit more interesting to do for the background. Since it is intended for a bench, the background needs to wear well – no openwork here.  And did I mention that I don’t currently have a piano bench to fit this canvas?

I may have gotten the canvas originally at Tapisseries de la Bucherie in Paris, but it has been so long that I’m not positive about that.  It would have been  at least 10 years ago, back  when the US$ was worth a lot more. 

March TIF

Do you remember the scene in The Wizard of Oz where the old house has been tossed and turned by the cyclone and dropped out of the sky, and Dorothy is standing in the dingy, black and white and grey weatherbeaten, worn-out house, and she opens the door and there is Oz, in gorgeous Technicolor?

That is spring.

At least, that is what spring can feel like.

Don’t mistake me – spring hasn’t made it to Ontario yet. We still have snowbanks along the driveway, and our composter is frozen solid, and there is snow in the forecast again for the next few days.

But in a few weeks, it will be here.

That is what I was thinking of in doing this TIF piece for March. As I wrote in an earlier post, one of the first signs of spring is when the winter aconite shows up. These are very tiny, bright yellow flowers, which suddenly pop out and are very vivid against the background of dead grass and last year’s leaves.

Here’s my piece:

I printed a b&w photo of dead leaves using the instructions I found here. I then added some flowers – some buds, some in full bloom – using french knots, oyster stitch, chain stitch, and fly stitch. The flowers don’t particularly look like winter aconite, but they do capture that bright, intense yellow that jumps out through the dirty brown, drab late winter landscape.

If I were spending more time working on this I would add some texture to the leaves – possibly running stitch and outline stitches, to emphasize the layers of leaves. But as this was an experiment for me (and I probably won’t get to do much more before the end of the month), I’m happy the way it is.

This was the first time I’d tried printing on fabric, and I was surprised at how easy it was. I ironed the fabric with freezer paper, ran it through the laser printer, and then let it sit for an hour or so before peeling off the paper.

One question – the instructions I used didn’t specify how to fix the image. I’m not sure if that is the correct term – maybe I mean stabilize? What I mean is, how do I keep the image from smearing or wearing off, or is that an inevitable problem with laser printers, as opposed to inkjet? Can someone advise me what to do?

Hamentashen

Last night I went on my annual hamentashen spree.  Hamentashen are a cookie traditionally made for the Jewish holiday of Purim.

I used the orange-and-oil dough recipe from Marcy Goldman’s “A Treasury of Jewish Holiday Baking,” to keep them parve, and her dried sour cherry and cranberry filling. (No poppy seeds here!) If that wasn’t non-traditional enough, a few I filled with Rootham’s apple peach cinnamon jam, and a few with Nutella.

By the way, should this be spelled “hamentashen” or “hamentaschen” (with the extra “c”) or some other way?  I googled both this afternoon.

Hamentashen –  28,200 hits

Hamentaschen – 16, 500 hits 

Hamantaschen – 47,500 hits

Hamantashen – 22,900 hits

Who knew?

Dorset Buttons again

Making these buttons is a bit addictive. Here’s a few more experiments. The black, in the black and red one, is no. 8 perl cotton, which was a little too thin for this. The blue used no. 5 perl, which was much easier, and faster, to work with, and I wove this like a spider web, rather than wrapping each spoke.

To give an idea of size, each button is about 1 inch (2.5 cm.) in diameter.

More small things

While procrastinating on stitching, I tried a small thing I had been curious about – making Dorset buttons. Dorset buttons are made from floss or yarn wrapped around a ring-shaped base. What could be smaller than a single button (well lots of things – snaps, hooks and eyes, to start with, but don’t take me literally) .

I learned that originally the bases for these buttons were made of circles stamped from horn, but mine are made from plastic curtain rings. A site called The Sampler has a good tutorial. The British Button Society has a page illustrating a number of varieties of buttons. Here is a link to some history on the buttons.

Here are my efforts:

These buttons were made with craft thread from the dollar store. I think that using yarn, perl cotton, or other any unstranded heavy floss might work better. I tried a couple of different patterns to wrap the centers, and added beads to one of the buttons.  The most awkward part for me was aligning the spokes so that they meet in the center of the ring;  I need some more practice on that – mine are slightly off-center.  I can imaging many ways to further ornament buttons, using beads, mixing threads, wrapping the center in a metallic thread, embroidering (french knots and lazy daisy in the center), wrapping with multiple threads, etc.

I found this an amusing task for several evenings. Reading through the history though, one thinks of the women who made a gross (144) of buttons per day to earn their living – not so amusing.

When I was in high school I played the bassoon. One summer I learned how to make bassoon reeds, one step of which involves wrapping the end with thread to form a sort of ball. In a way, making these buttons reminded me a bit of that. I was much better at wrapping reeds than at the rest of the steps involved in making reeds – and far better at wrapping than actually playing the instrument.

Buttons are such trivial things these days. I can go to the drug store, grocery store, or dollar store – not to mention any fabric or craft store – and buy buttons in any range of sizes, colors, makes. Plastic, wooden, shell, metal, etc. Imagine a time when buttons were all handmade, when they were a craft rather than a commodity.

More thoughts on March’s challenge

I forgot to mention the colors for March’s challenge.

Actually, I didn’t forget – I just ignored them. This palette as a whole doesn’t do much for me. I will probably work a green and brown into my piece for this month, but I’m not sure it will be these particular shades.

I’m still thinking about the winter aconite, and other small flowers that announce spring. In lieu of actual stitching (because even with a foot and a half of snow this weekend and staying indoors, except to shovel, my motivation is sort of low right now), I’ve been playing with images, looking at different ways to interpret flowers. Starting with:

I turned it into this:

and this:

and this (which would be truly disturbing to see on a spring morning)

Why (other than wasting time) was I doing this?

When I first thought of embroidering flowers, I was thinking of something very traditional, and frankly, sweet – satin stitch for the petals, perhaps outline stitch on the leaves, with some couching and french knots for the inside of the flowers.  But there are other ways I could do this.   The second image, with the blue flowers could be done with applique.  The next image, in black and white, could be translated into blackwork.  The last image, with the hot pink flowers on blue background, could be printed on fabric, with some overstitching.

Small things

The March challenge for Take It Further is

“Do you ever notice the little things, the small moments, the details in life? This months challenge is to do just that, pay attention to the tiny details. Sometimes the small things become emblematic for something larger.”

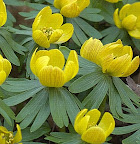
Some of the tiny details I’m watching for are the early indicators that spring is coming, that I’m not doomed to endless months of ice and snow. The earliest flowers that appear in this area are winter aconite (Eranthis hyemalis). These are tiny, tiny flowers – little gems, about half the size of crocuses, with a flower about the size of a thumbnail. Here’s a picture:

(Source: Martin Olsson – Wikipedia)

These appear about a week earlier than crocuses, and their vivid yellow bursts through the last snow, the rotting leaves, and accumulated mess from the winter. They’re one of the first signs that spring is indeed coming. After these appear, the crocuses show up, and then several days later the earliest daffodils, and then everything else comes in a mad rush and pretty soon it is June and the garden isn’t in yet.

For this month’s challenge, I’m using these flowers as a starting point.